Monday, September 29, 2014

OCTOBER FAVS | Lifestyle

FAVORITE LOOK

FAVORITE JEWELS

FAVORITE INTERIOR

FAVORITE ADVENTURE

FAVORITE SHOE

FAVORITE QUOTE

FAVORITE CHOW

FAVORITE BEAUTY LOOK

FAVORITE EXTERIOR

Friday, September 26, 2014

Jamberry | Lifestyle

Hey ya'll! Hope you all had a great week! The fair is in town and I'm so excited about all of the people watching, fair food and carnival games that will soon be taking up my weekends! When the fair comes to town it officially means it's fall here in Oklahoma. You start seeing the pumpkin patches pop up and I start my super early CHRISTMAS shopping. Yes, I know it's still September but I like to get it done and out of the way since I learned my lesson about shopping the day of. One of the things I'm excited about getting all of the women in my family this year is JAMBERRY NAIL WRAPS! Now if you know me, you know that I used to love getting shellac mani's until about 5 months ago when I decided to get it taken off and give my nails a break. I had always heard that shellac wasn't damaging but let me tell you - my nails had NEVER been that bad before. Since then I've had naked nails and keep them pretty short and neat.


When my friend Taylor started using Jamberry she FELL IN LOVE WITH THEM!! I kept seeing her post about them on FB & on my Pinterest feed so when she asked me if she could send me some samples I said ABSOLUTELY!! When I got the samples in the mail I freaked out. The patterns she sent me were so cute and something I wold have picked out for myself. I had also JUST cut my nails down so I waited a couple days before I applied them. I will say I was a little nervous when it came to applying them since I hadn't done it before so she referred me to short video that explained the best and easiest way to apply them so when I did apply them it was super easy. I've only had them on a day but I already LOVE them! Look at some of the other patterns they offer >>


Aren't the AMAZE?! They just launched new fall patterns and you can even create your own CUSTOM wraps!! Plus if you order in the month of September there is a special offer!!

Check out her site HERE

(They will make the perfect stocking stuffers!)

XO, Erica

Wednesday, September 24, 2014

Love Your Roll | Fitness

I'm not a huge fan of foam rollers. However, using them can do WONDERS for your body!! I though I was going to cry the first time I used one and since then it hasn't gotten much better. About a week ago I was watching some of the new Tone It Up video's and I thought about commenting on the post and requesting a foam rolling video. You would be surprised at how many foam roller videos on you tube are wrong. I knew K&K could come to the rescue with a great video. To my surprise they posted a new video yesterday about FOAM ROLLING!! I got super excited and went to rolling last night in my living room. I'm HELLA sore but I feel amazing! I knew I had to share it with you guys because it will seriously change your life & your body. XO, Erica

NEW Frisky Fall Foam Roller Routine!

Tone-It-up-foam-roll-routine-frisky-fall

It’s Tone It Up Tuesday! Are you ready to feel amazing?

Sign up for the Frisky Fall Challenge… it’s not too late! Just sign up with your email below. Find everything you need to get started HERE!
After 3 weeks of intense Frisky Fall workouts, today’s brand NEW routine is perfect for releasing tight muscles and easing soreness.
Not only do these moves relax your body, but just like with sports massages, foam rolling is a great tool for athletic performance too! You’ve heard us talk about foam rolling before and as requested, today we’re sharing a completely new routine along with some tips you need to know!
Lengthen your body, decrease inflammation and increase flexibility with your NEW Frisky Fall routine below. You can perform these moves every day!

Foam Rolling Tips you NEED to know!

Staying healthy and on top of your workouts goes hand-in-hand with taking care of yourself. Massage anyone!? While we LOVE a trip to the spa to release tight muscles, did you know that a few minutes on a foam roller can also do the trick?
Screen Shot 2014-09-21 at 1.17.09 PM
What is it? It’s a form of stretching used by athletes or anyone needing relief from tight muscles. It’s technically referred to as self myofascial release, and it’s a little bit like giving yourself a deep tissue massage to release knots and ease tight areas.
Releasing tight muscles is essential, not only because you’ll feel awesome afterwards, but also because it helps prevent injuries, improves posture and increases range of motion.
How to do it: It’s best to foam roll after a workout when your muscles are warmed up. Place the roller behind soft tissue like your calves or thighs, avoiding joints, and slowly start rolling. When you find a tight spot, hold it for 30 – 60 seconds until it releases. It might feel a little uncomfortable or tender, but go at your own pace and follow your comfort level. Take a look at the videos and routines below for the basics!
Tips ~
  • Foam rolling is great for anyone, but it’s especially important if you’re active to help with muscle recovery, circulation and even performance. Tightness can occur from regular workouts – or even from sitting at the computer for long periods of time.
  • Always listen to your body! Foam rolling may hurt, but it should also feel good, like a deep tissue massage. Never force or continue to foam roll in an area where there’s sharp pain.
  • We love to foam roll a few times a week! Start with shorter sessions and work your way up to longer ones.
  • Remember to always stretch after foam rolling and just like with a massage, to drink PLENTY of water afterwards!
  • Which one to buy? Most foam rollers are color coded based on firmness. White is the softest, black the firmest and other colors fall in between. The type you purchase really depends on the type of pressure you want and are comfortable with. Just keep in mind that the firmer ones will last longer and give you the best release! We really like these.
Thursday, September 18, 2014

Lauren Conrad: Fall Essentials | Re-Post

Happy Thursday!! IF you didn't know LC got married!! I'm always trying to stay up to date on her site with her tips, tricks, beauty & fashion insights. So when I saw that she had gathered a list of her fall essentials and I just knew I had to share. Everything with her is always so classic, even back to her days on MTV - she was always classy and chic which is what I think everyone should aim for. I hope you enjoy it! XO, Erica 

Lauren Conrad Shares Her Ultimate Fall Shopping List


With autumn right around the corner, I find myself getting excited for everything the season has to offer. From pumpkin soufflĂ© candles to faux leather leggings, transitioning from summer to fall can be a lot of fun when you know which pieces to add to your wardrobe, home, and beauty routine. With that in mind, I’ve rounded up my absolute favorite purchases for the season.
  • of 13
    Paper Crown Viola Midi Dress ($288)
    A pretty midi dress is the perfect way to transition your wardrobe from summer to fall. I love this one from my Paper Crown line. It’s easy to throw on and can be worn to work, dinner, and even date night. 
  • of 13
    Keeping my lips soft and smooth all year round is a must, which is why I’m such a fan of Jouer’s Hydrating Lipstick. My favorite shade right now is Elizabeth, a soft pink that adds a little bit of color and a lot of moisture to my lips.
  • of 13
    BipAndBop Sweethearts Necklace ($34)
    I love a dainty, everyday necklace. In light of my recent nuptials, this sweethearts necklace I found on Etsy will be accompanying my ensembles this fall. 
  • of 13
    LC Lauren Conrad for Kohl’s Faux Leather Leggings ($21)
    A good pair of faux leather leggings is a fall style staple for me. This pair from my Kohl’s line is not only extremely comfortable, but also affordable. They look great with everything from a sweater and flats to a button-down blouse and booties.
  • of 13
    Anthropologie Russet Measuring Cups ($28)
    I love all things rose gold, so these copper measuring cups caught my eye while I was perusing Anthropologie’s website. I love to cook and bake as often as I can, so these little guys will get a ton of use.
  • of 13
    Paper Crown Camera Sweater ($290)
    I get pretty excited to break out all of my sweaters during the season. I especially love this one from Paper Crown, which includes a sweet Peter Pan collar and some ladylike embellishments. 
  • of 13
    Rag & Bone Floppy Brim Fedora ($195)
    I’ve been wearing my J.Crew Panama hat all summer long. Now that fall is almost here, I’ll be switching out my summer hat for this cute floppy fedora byRag & Bone. A great floppy hat immediately elevates any look, and is an ideal way to cover up your not-so-perfect hair days.
  • of 13
    One of my favorite things about fall is all of the flavors that come into play this season. I wait patiently every year for this pumpkin soufflĂ© candle to become available at Anthropologie. Because who wouldn’t want their house to smell like pumpkin pie?
  • of 13
    LC Lauren Conrad for Kohl's Embroidered Lace Crop Top ($33), Faux Leather Skirt ($35), and Platform High Heels ($37)
    This has to be one of my favorite outfits from my new LC Lauren Conrad collection at Kohl’s. The crop top, faux leather skirt, and platform heels are perfect for a night out with your girls, or a romantic date night with your beau. Just throw on a denim jacket, and you’re ready to go.
  • 10 of 13
    Rag & Bone Classic Newbury Booties ($495) in Nubuck
    A good ankle bootie is a must-have for the season. I really love this neutral one from Rag & Bone. Throw it on with jeans and a sweater for a cozy fall outfit. You can also pair this chic ankle bootie with one of your summer dresses, which helps take your warm-weather wardrobe right into autumn.
  • 11 of 13
    Rebecca Minkoff Love Cross Body Bag ($295) in Burgundy
    As the weather cools down, my wardrobe and accessories tend to gravitate toward cozier colors. Think: oxblood, camel, and hunter green. A good cross-body bag is a style staple for me, and I love this burgundy one by Rebecca Minkoff for the fall months. 
  • 12 of 13
    Anthropologie Filomena Baking Collection ($16-$36)
    Baking is one of my favorite things to do when I have downtime. From pies tocookies and cupcakes, there’s something about making sweet treats in the kitchen that relaxes me. I love this sweet baking set from Anthropologie, which will be perfect for making all of my favorite fall treats.
  • 13 of 13
    Wolof Weavers Sea Foam Stripe Tall Hamper ($148)
    I’ve been decorating my home in Laguna lately, and just bought this striped hamper from my fair-trade shop The Little Market to go in one of the bedrooms. 
    And there you have it! Keep an eye out in October for the next roundup of items I’m absolutely loving. 
    What’s on your list of fall favorites?
    XO Lauren
    For more tips, tricks, and advice head to LaurenConrad.com!


Sunday, September 14, 2014

Let's Bake | Chow

With a significant change in the weather - fall is officially here!! I'm so glad we finally said goodbye to the near 100 degree days and welcomed the warm sun and cool breeze's of fall. The past week I've turned of my ac and have just had doors and windows open. It's such a great feeling to have lots of fresh air and natural light in my home. I wish it would stay like this all of the time!! Well with holidays quickly approaching I figured I would start looking up some new yummy fall baking recipes. I will be making some of these in the next weeks or so at a fall baking party so I will let you know which ones are my favorite! XO, Erica


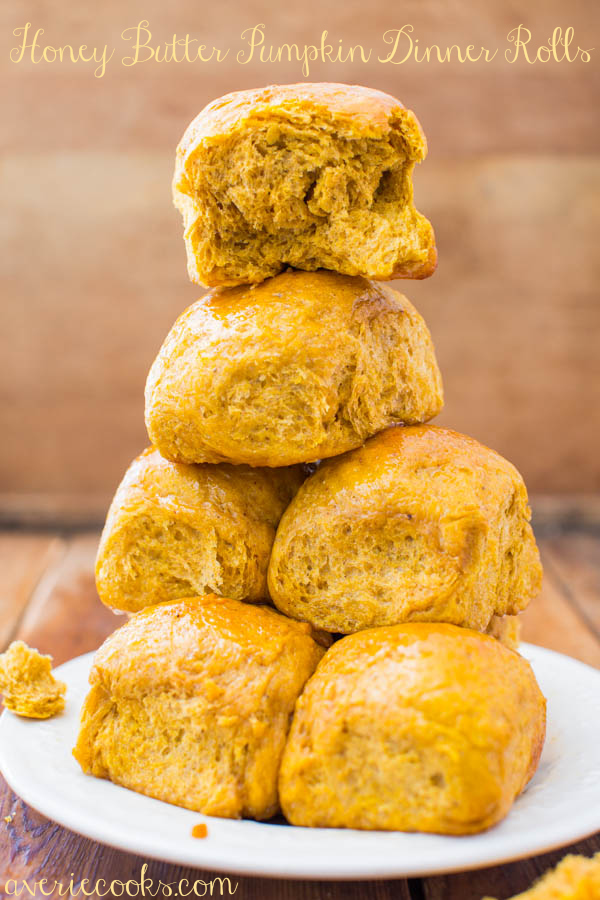
Honey Butter Pumpkin Dinner Rolls
Honey Butter Pumpkin Dinner Rolls - Big, soft rolls brushed with honey butter are the best! Everyone loves them and they disappear so fast!

YIELD: 8 to 10 hearty rolls
 
PREP TIME: 15 minutes
 
COOK TIME: 16 minutes
TOTAL TIME: about 2 hours, mostly downtime for rising

INGREDIENTS:

Dough
1/3 cup milk
2 tablespoons unsalted butter
1 large egg
1/2 cup pumpkin puree
2 1/4 cups all-purpose flour (bread flour may be substituted; rolls will be firmer and chewier rather than softer and fluffier; you may only need 2 cups bread flour)
2 1/4 teaspoons instant dry yeast (one 1/4-ounce packet, I use Red Star Platinum)
1 tablespoon granulated sugar
1 tablespoon pumpkin  pie spice
1 teaspoon ground nutmeg
1/2 teaspoon salt, optional and to taste
Honey Butter
2 tablespoons unsalted butter, melted
2 tablespoons honey
Tip: Combine equal parts softened butter (not melted) and honey, and whisk together until fluffy and combined for serving with the rolls

DIRECTIONS:

  1. Dough - Add milk to a 2-cup microwave-safe measuring cup, or microwave-safe bowl.
  2. Add butter and heat on high power to melt butter, about 45 seconds. Stir until butter has melted smoothly into the milk.
  3. Add the egg, pumpkin puree, and whisk to combine.
  4. Return measuring cup to microwave and heat for about 15 seconds to warm mixture up. This will help to activate the yeast; set aside briefly.
  5. To the bowl of a stand mixer fitted with the dough hook or large mixing bowl for hand kneading, add the remaining dough ingredients, thorough optional salt.
  6. Pour wet pumpkin-milk mixture over the dry ingredients.
  7. Turn mixer to low speed, and knead for 5 to 8 minutes, or until dough is smooth and has come together. This is not a sticky dough and if your dough is sticky, tacky, or gloppy, add additional flour, 1 tablespoon at a time, until dough is no longer sticky. I doubt you will need to add any, because I could have made this recipe with 2 cups flour, but went up to 2 1/4. Don't over-flour your dough because it creates rolls that are dense and heavy.
  8. Turn dough out into a mixing bowl that's been lightly sprayed with cooking spray. Flip dough over once so both sides are lightly greased, and cover bowl with plasticwrap.
  9. Place bowl in a warm, draft-free environment until dough has nearly doubled in bulk, about 45 to 60 minutes. Do not go by time elapsed on the clock. Wait until dough has nearly doubled in size, and if it takes longer than an hour, that's fine.
  10. Punch dough down and turn it out onto a nonstick surface. I spray my counter with cooking spray and don't even need to add flour.
  11. Divide dough into 8 to 12 equally-sized portions, rolling each portion into a ball. I made 8 rolls and they were very generously sized. I would aim for 9 to 10 rolls. They may look skimp now but don't worry, they rise and swell very nicely.
  12. Place dough balls into a foil-lined and cooking sprayed 9-inch square pan. If you would like to use an overnight or make-ahead option, after you get the rolls into the pan and covered with foil, place pan in fridge. When ready to bake, pick up with the next step below, making sure to allow the dough to come to room temp and rise nicely; it could take longer than the 45 minutes indicated below since dough is coming right out of a cold fridge.
  13. Cover pan with a sheet of foil, place pan in a warm, draft-free environment until dough has nearly doubled in bulk, about 45 minutes. In the last minutes of rising, preheat oven to 375F.
  14. Honey Butter - Melt butter in small microwave-safe bowl, about 45 seconds on high power.
  15. Add the honey and stir to combine.
  16. Before baking, generously brush dough with honey butter; reserve any extra and brush it on after baking.
  17. Bake for 15 to 17 minutes, or until puffed, golden, domed, cooked through, and when tapped, the rolls should sound hollow. Allow rolls to cool in pan until they're cool enough to handle before serving. Rolls will keep airtight at room temperature for up to 4 days. Heat in microwave for 5 to 10 seconds as necessary to recreate the just-baked taste and to soften. Finished (baked) rolls will keep airtight in the freezer for up to 6 months. I have not tried freezing this dough in the unbaked state but you could likely freeze it after step 12 and upon thawing, pick up with step 13; however I haven't tried. Nor have I tried doubling the recipe, but I imagine that would be fine. Bake in a 9x13 pan or similar.


Coconut Almond Muffins


Ingredients

  • 3/4 cup oat flour
  • 1/2 cup rolled oats
  • 1 teaspoon baking powder
  • 1/4 teaspoon baking soda
  • 1/4 teaspoon salt
  • 3/4 teaspoon cinnamon
  • 1/2 teaspoon ground ginger
  • 1 cup unsweetened coconut flakes, plus more for topping if desired
  • 1/4 cup natural almond butter
  • 1/4 cup unsweetened apple sauce, plus 2 tablespoons
  • 1/2 teaspoon pure vanilla extract
  • 1/2 teaspoon pure almond extract
  • 1/2 teaspoon apple cider vinegar
  • 1 large egg white
  • 1/4 cup honey, plus 1 tablespoon
  • 1/2 cup vanilla almond milk, unsweetened

Directions

  1. Preheat your oven to 400°F and spray a muffin tin with cooking spray
  2. In a medium bowl, stir together the oat flour, rolled oats, baking powder, baking soda, salt, cinnamon, ginger powder and coconut flakes until well combined. Set aside.
  3. Place the almond butter into a large, microwave safe bowl and microwave until it begins to soften. Add in the apple sauce, vanilla and almond extracts, apple cider vinegar, egg white, honey and vanilla almond milk. Stir until well combined.
  4. Stir the oat mixture into the almond butter mixture until just moistened.
  5. Fill the prepared muffins tin and sprinkle with coconut flakes, if desired. Bake until golden brown, and a toothpick inserted in the center of a muffin comes out clean, about 17-20 minutes.
  6. Let the muffins slightly cool in the pan, and then transfer to a wire rack to finish cooling.


Strawberry Cinnamon Rolls

Strawberry Cinnamon Rolls
Prep time: 20 mins     Cook time: 30 mins     Total time: 50 mins     Serves: 12

Ingredients
  • ¾ cup milk
  • ⅓ cup margarine or butter, softened
  • 3¼ cups all purpose flour
  • 1 (.25 ounce) package of instant yeast - 2 tsps
  • ¼ cup white sugar
  • ½ tsp salt
  • 1 egg
  • ¼ cup water

Filling
  • 1 cup strawberry jam (+/-)
  • ½ teaspoon cinnamon
  • 2 cups sliced strawberries

Icing
  • 1 cup powdered sugar
  • ¼ tsp cinnamon
  • 1-2 tbsp milk

Instructions
  1. Heat the milk in a small saucepan until warm. Mix in the butter until melted. Let cool to lukewarm.
  2. In a large bowl combine 2¼ cup flour, yeast, sugar, and salt. Mix well.
  3. Stir in egg and ¼ cup of water. Mix well. Now stir in the milk mixture until dough forms.
  4. Stir in another cup of flour. When dough comes together flip onto a lightly floured surface and need until smooth.
  5. Return the dough ball to the bowl, cover with a damp towel, and let rest for 10 minutes.
  6. Roll out dough into a 15x10 inch rectangle. Spread the strawberry jam all over the dough. Sprinkle with cinnamon. Then evenly cover with the chopped strawberries.
  7. Roll up the dough and pinch the seam to seal. Cut into 12 equal size rolls.
  8. Place rolls cut side up in a greased 11x13 baking dish. Cover and let rise until doubled (30 mins). While waiting preheat oven to 375 degrees F.
  9. Bake in the preheated oven for 30 minutes or until golden brown.
Glaze
  1. Mix the powdered sugar and cinnamon with 1 tbsp of milk. Stir until glaze forms. You may need to add up to another tablespoon of milk for desired consistency. Drizzle glaze over finished rolls.